First, the formation of the reasons for the abnormal machining accuracy caused by the formation of abnormal machining accuracy reasons for the strong concealment, diagnosis is more difficult, summed up five main reasons: the machine tool feed unit was changed or changed; machine tool axis offset abnormal zero; Axial reverse voids are abnormal; motor operation is abnormal, that is, electrical and control parts are abnormal; mechanical problems, such as screw, bearings, couplings and other components. In addition, the preparation of machining programs, tool selection and human factors may also lead to abnormal machining accuracy.

Second, the CNC machine tool fault diagnosis criteria 1. First outside the internal CNC machine is a set of mechanical, hydraulic, electrical as one of the machine tools, so the fault of the disease will be reflected by the three summed up. Repair personnel should be checked from the outside to the inside one by one, try to prevent unsealing and dismantling, otherwise it will expand the fault, make the machine tool loss accuracy, and reduce the function.
2. Mechanical first, then electrical Generally speaking, mechanical problems are more easily detected, and the definite diagnosis of the numerical control system is more difficult. Before troubleshooting, the first priority is to remove mechanical problems and often achieve a multiplier effect.
3. After the first static motion, first, under the condition of the power failure of the machine, through understanding, investigation, testing, and analysis, it is believed that after the non-destructive defect, the machine tool can be energized; under the operating conditions, dynamic investigations are conducted. Check and test to find faults. For destructive problems, the risk must be removed before power is applied.
4. Briefly after the clutter When there are a variety of problems intertwined and concealed, and one cannot start, one should first deal with simple questions and post-processing more difficult questions. After dealing with simple issues, difficult problems may also become brief.
Third, the diagnosis of CNC machine tools troubleshooting methods 1. Intuitive method: (Wang Wen asked to cut) asked - machine defects, processing conditions, etc.; see -CRT alarm information, alarm lights, capacitors and other components deformation smoke burnt, protector tripping, etc. Listening - abnormal movement; smell - smell of electrical components and other odor; touch - fever, oscillation, poor contact and so on.
2. Parameter checking method: Parameters are usually stored in RAM. Sometimes the battery voltage is insufficient. The system will not lose power or disturbance due to no power or external interference for a long time. The parameters should be checked and corrected according to the characteristics of the fault.
3. Isolation method: Some problems, it is difficult to distinguish between the numerical control part is still formed by the servo system or the mechanical part, often used isolation method.
4. The same type of swap method replaces a template that is suspected of being defective with a spare board that serves the same purpose, or swaps the same template or unit that functions.
5. Utility program test method Write all the commands of G, M, S, T, and functions into some small programs. When these problems are diagnosed when they are diagnosed, you can determine the lack of function.
Fourth, the processing accuracy of the abnormal diagnosis and treatment of abnormal cases 1. Mechanical defects lead to abnormal processing accuracy problems: a SV-1000 vertical machining center, using the Frank system. During the machining of the connecting rod mold, it was found that the Z axis feed was abnormal and formed a cutting error amount of at least 1 mm (cut in the Z direction).
Fault diagnosis: During the investigation, it was learned that the problem was a sudden onset. The machine tool is jogging, and each axis is operating normally under the method of manually inputting data, and the reference point is returned to normal, without any alarm indication, and the possibility of the electrical control part being wiped out is eliminated. It should mainly review the following aspects one by one.
Look at the machining block that is running when the machine's accuracy is abnormal, especially the tool length compensation, the correction and accounting of the machining coordinate system (G54-G59).
In the jog mode, the Z-axis was repeatedly moved. When the patient was diagnosed by visual, acuity, or touch, the motion was confirmed to be abnormal. In particular, the Z-direction motion noise was abnormal. In particular, rapid jogging made the noise more noticeable. Judging from this, machinery may be dangerous.
Check the accuracy of the machine's Z axis. The z-axis was moved by hand using a pulse generator, (set its magnification to 1×100, ie, the motor feeds 0.1 mm for each step). The cooperation dial indicator was used to investigate the movement of the Z-axis. When the unidirectional motion persists as normal, the positive movement of the starting point, the pulser changes every step, the practical interval of the Z-axis motion of the machine d=d1=d2=d3=...=0.1mm, which shows that the motor runs well and the positioning accuracy is also outstanding. . Returning to the machine tool, the change of motion displacement can be divided into four stages: (1) The interval between machine movements d1>d=0.1mm (the slope is greater than 1); (2) It is expressed as d1=0.1mm>d2>d3 ( Slope is less than 1); (3) The machine tool organization practice has not moved, manifests the most standard reverse void; (4) The machine tool movement interval and the pulse generator fixed value (slope is equal to 1), recovers to the normal movement of the machine tool. No matter how to compensate for the reverse gap, its characteristic is: In addition to (3) phase compensation, other changes still exist, especially (1) stage severely affect the machining accuracy of the machine tool. The compensation found that the greater the gap compensation, the greater the interval at which (1) the stage moves.
Analysis of the above view that there are several possible reasons: First, the motor is abnormal, and second, mechanical problems, and third, there is a gap in the screw. In order to further diagnose the problem, the motor and the screw are completely disengaged, and the motor and the mechanical part are separately viewed. The result of the inspection is that the motor is operating normally; in the final diagnosis of the mechanical part, it was found that when the screw is moved by hand, there is a great sense of vacancy in the initial motion. Under normal conditions, it should be able to feel the smooth and smooth movement of the bearings.
Deal with the problem: After dismantling the inspection, it was found that the bearing was indeed damaged and that the ball had fallen off. The machine tool recovered to normal after replacement.
2. Inappropriate handling logic leads to abnormal machining accuracy. Problem: A machining center produced by a Shanghai machine tool manufacturer. The system is Frank. During the machining process, the accuracy of the X-axis of the machine tool is found to be abnormal. The accuracy error is a minimum of 0.008mm and a maximum of 1.2mm. Fault diagnosis: During the inspection, the machine tool has now set the G54 workpiece coordinate system as required. Under the manual data input method operation, a program is run in the G54 coordinate system, namely "GOOG90G54X60.OY70.OF150; M30;", and the machine coordinates appearing on the displayer after the operation of the standby bed is (X axis) "-1025.243", Record this value. Then, under the manual method, the machine tool is moved to other arbitrary orientations, and the previous program is again operated by manually inputting data. After the bed is stopped, it is found that the machine coordinate value appears as “-1024.891â€, same as the previous fulfillment. After the comparison of the value of a difference of 0.352mm. In accordance with the same approach, the X-axis jog to a different position, repeat the performance of the program segment, and the value appear on the display are different (unstable). A careful examination of the X-axis with a dial indicator shows that the mechanical orientation practice errors are fundamentally common to the errors that appear in the figures, and thus assume that the gross pathogens are too large due to repeated X-axis positioning. Check the X-axis's reverse gap and positioning accuracy, and re-compensate for the error value. The result will not achieve any effect. Therefore, it is doubtful that there are problems with the scale and system parameters. But why did such a large error occur, but did not present the corresponding alarm information to further check and found that this axis is the axis in the straight direction. When the X axis is released, the headstock drops downward and an error is formed.
Fault handling: The PLC logic control program of the machine tool has been modified. When the X axis is released, the X axis is enabled to load and the X axis is released. When the X axis is clamped, the X axis is clamped. Immediately afterwards, remove the enabler. Adjusted machine tool problems can be dealt with.
3. Machine orientation problems lead to abnormal processing accuracy problems: a vertical CNC milling machine manufactured in Hangzhou equipped with the Beijing KND-10M system. During the jogging or machining process, the Z axis was found to be abnormal.
Defects diagnosed: View found that the Z-axis moves up and down unevenly and with noise, and there is a certain gap. When the motor is started, there is unstable noise and uneven force in the Z-axis movement under the jog method, and it feels that the motor vibrates fiercely; when it moves downwards, there is no vibration so significant; when it stops, it does not vibrate. , In the processing process is more significant. Analysing that there are three reasons for the fault: First, the screw reverse large gap; Second, the Z-axis motor operation is abnormal; Third, the pulley is damaged to the uneven force. However, there is a problem that should be noted is that when the suspension is not trembling, uneven up and down movement, so the problem of motor operation can be removed. Therefore, the first diagnosis of the mechanical part, in the course of diagnosis and testing did not find abnormalities in the public service. Using the sweeping rule, as long as the belt is in trouble, when the belt was inspected, it was discovered that the belt had just been changed soon. However, when the belt was inspected carefully, it was found that the inside of the belt showed different degrees of damage, which was obviously the uneven force. To what is the cause of the formation of the motor in the diagnosis found that there is a problem, that is, the azimuth of the azimuth of the clamp to form an uneven force.
Fault treatment: as long as the motor reinstalled, aiming at the point of view, measuring a good interval (motor and Z-axis bearings), the two ends of the belt (length) should be uniform. In this way, the Z-axis moves up and down unevenly and the phenomenon of noise and chatter is eliminated, and the Z-axis processing is normal.
4. The system parameters are not optimized, and the abnormal operation of the motor leads to the machining accuracy. The anomalous system parameters mainly include machine feed units, zero offsets, and reverse voids. For example, the Frank CNC system has two feed units, metric and imperial. In the process of repairing a machine tool, part of the treatment often affects the zero offset and the change of voids. After the faults are processed, adjustments and corrections must be made. On the other hand, because the mechanical wear is severe or the connection position is loose, parameters may be measured. The value of the change, the need to make appropriate changes to the parameters in order to meet the requirements of machining precision.
Symptoms: A vertical CNC milling machine manufactured in Hangzhou equipped with the Beijing KND-10M system. During the machining process, the X-axis accuracy was found to be abnormal.
Fault diagnosis: Check that there is a certain gap on the X axis, and there is an unstable phenomenon when the motor starts. When touching the X-axis motor by hand, it feels that the motor pulls fiercely, and the pull is not significant when stopped, especially when the jog method is used. Analyze that there are two reasons for the fault: First, the screw anti-air gap is large; Second, the X-axis motor operation is abnormal.
Fault handling: Use the KND-10M system parameter function to debug the motor. The compensation for the existence of the gap is firstly performed, and then the parameters of the servo system and the parameters of the pulse pressing function are adjusted. The vibration of the X-axis motor is eliminated, and the machining accuracy of the machine tool is recovered to normal.
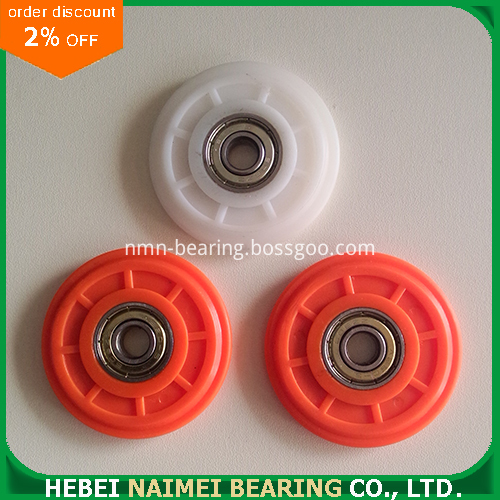
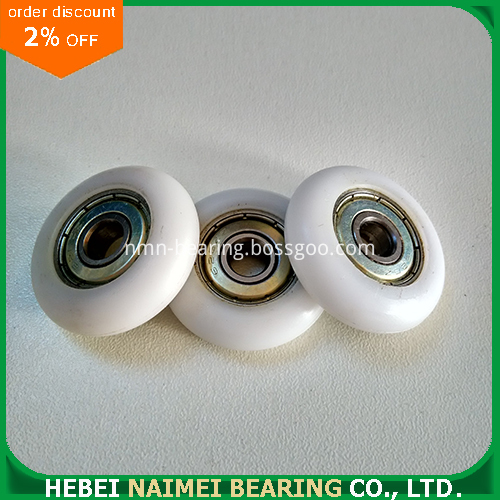
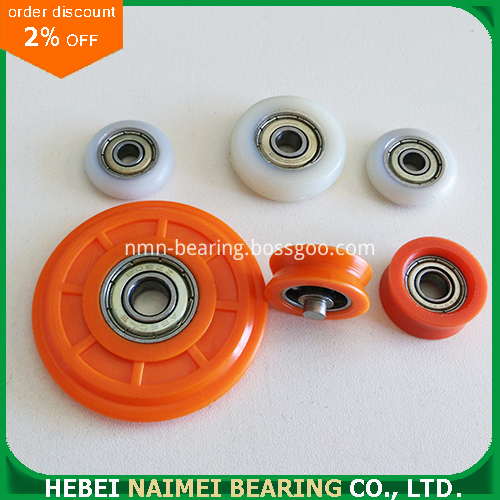
Convex Plastic Roller: Hebei Naimei Bearing Co., Ltd. produces kinds of Convex plastic rollers. It could be standard bearing 608 or 626 or other types injected with plastic material of POM or Nylon. Or, it could also be non-standard bearings injected of plastic materials. It is used widely in sliding applications, such as sliding doors, sliding windows, shower doors, glass doors, aluminium doors or furniture wheels, etc,is also called shower sliding door roller. Convex plastic rollers are very multi-functional. Right now, our products are being exported to Brasil, Spain and Turkey, with good credit.
Hebei Naimei Bearing Co., Ltd. produces types of plastic bearing rollers:
1). Material: Carbon Steel/ Chrome Steel Bearing + Plastic( POM/ NYLON) Injection;
2). Application: for Aluminium Door and Windows; Aluminium Hardware Accessories and other sliding applications;
3). Plastic Color: Various, as per Request;
-- For any detailed inquiry of Non-Standard Bearing rollers, pls contact us freely. We will make a response within 12 hours.
Sliding Plastic Roller - Factory Direct Hot Sale
Bearing rings: Dimension tolerance, geometric tolerances, and surface quality of bearing` s working surface will influent the operating noise. Naimei Bearing adopts precision CNC machining to dimension precision, geometric tolerances, design drawing, mold making, grinding, cleaning, assembly, testing, every link of strict checks, so as to ensure all our products are tested by our strict criteria.
Balls: The balls evenly with by the cage, often make rolling movement between 2 rings. The shape, size and number will directly influent bearing`s load tolerance and operating capability. We use high precision, small vibration steel ball. It`s surface must be strengthened, no bumps scratches, lacerations, pitting and notch.
Cage: Enclose and move with all or part of the balls. It also be used to insulate the balls, guide the balls` movement and to improve lubrication performance inside the bearing., etc. Naimei Bearing`s cage is commonly made of cold rolling carbon steel. But in the corrosiveness environment, nonparallel or high-speed situation, stainless steel, engineering plastics cagecan be decided on request.
Seal: Naimei Bearing adopts different kind of seal material to meet the requirement of their operating in high temperature and being compatible with grease. Acrylonitrile-butadiene rubber is our standard material. but in high temperature environment ,often adopt fluorocarbons, silicone , PTFE shield.


Convex Plastic Roller,Sliding Furniture Roller,Bearing Furniture Roller,Plastic Roller Ball Bearing
Hebei Naimei Bearing Co., Ltd. , https://www.nmn-bearing.com